Tuesday, June 30, 2020

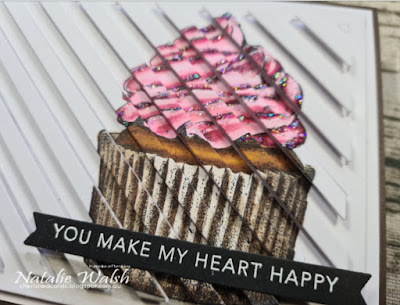
Eclipse Cupcake

Hi Everyone,

Today I have a card that is a little out of the box for me. It's been in my head for a few days now. I woke up at 2am with this card, of course! I hope you like it!


Recipe:
PaperRose Diagonal Stripe Die
Darkroom Door Cupcake DDES047
Stardust Stickles 
Xpress It Blending card
Brown Cardstock from my stash
The sentiment is from a Taylored Expression set. FYI I'm talking to the cupcake there! lol

Copics Used:
Icing: RV29, RV14, RV11, RV02
Cake: E59, E37, E25, YR23
Wrapper: E47, E44, E43, E41
Ground: W5, W3, W1

I really liked how it turned out.

You can find the video here

Saturday, June 27, 2020

Pawsitively Awesome

Hi Everyone,

Today's card is using an older stamp set called U have my heart by MFT. I did check at the time of writing this and it is available.

Recipe:
MFT: U Have My Heart
Paper Rose Diagonal Stripe Die
Copics Used:
Skin: E04, E11, E00, E000
Hair: E37, E34, E30, 0 
Dog: E49, E29, E39
Dress: E19, YR18, YR04
Grass: G99, G94, G82


I hope you enjoyed it.


Please check the video here.

Friday, June 26, 2020

#teamtinyunderthesea Hop

Today's card is part of a hop for 7 Kids Crafts store. Kelly has lots of different products and some digital stamps. You can also find her facebook page here

 Until the 19th of July 2020 Kelly is offering 20% to viewers using the code: Vacation


 Recipe:
Honey Bee Radiant Circles
Spellbinders Standard Circle Small
Uniquely Creative Tropical Sea Sequins

Copics Used:
Skin: E04, E11, E00, E000, R20
Hair: G29, G17, G02, G00
Tail: R89, R29, R27, Y19, Y17, Y13, G29, G17, G02, G00
Leaves: BG78, BG75, BG72
Background: BV29, BG78, BG75, BG72, BG10


You can find the video here.

Please go over and check out the store. Thanks for stopping by.
 

Tuesday, June 23, 2020

Love from the mothership

Hi again,

Today we have a card for Lesley from Little Bits

You can contact her through her website or by phone if you are in Australia on 03 97984122


Recipe:

Paper Rose: Hud Outline
MFT: Out of this World Stamp (or any spacey theme set)
Distress Oxide Inks: Barn Door, Dusty Concord, Blueprint Sketch and Black Soot
White Acrylic Paint
Versafine and clear embossing powder.
Stardust Stickles


You can check out the video here

Thank you for stopping by.

Wednesday, June 17, 2020

4 Rainbow cards with 2 backgrounds

Hi Everyone,

Today, I decided to play with the Paper Rose Diagonal Stripe die. Ever since I saw it I wanted to do this. Really, I am getting 7 ....ish cards. I still have a background from the leftover ink and 2 frames I could use for an different looking cards.

I am using the Paper Rose Diagonal Stripe and their Hello Layered die. With those dies I am also using Candied Apple, Carved Pumpkin, Squeezed Lemonade, Mowed Lawn, Salty Ocean and Wilted Violet Distress Inks.

Extra tools are Marvy Jewel Picker, Uniquely Creative Sequins and Multi Mat Medium.


The leftovers I still have to play with are these. 2 frames that could be use to frame something, of course and leftover ink from when I was inking. They can be a quick and easy card. This is how you could get possibly 7 cards out of 2 backgrounds!


You can check out the video here.

Thanks for stopping by. Take Care 

Monday, June 15, 2020

Daisy Frame

Today's card is something that had to change direction abit. DO NOT DO WHAT I DID! lol
I did a stupid mistake! Check out the video below to see.


Recipe:
Now it isn't easy to tell you what I used. Uniquely Creative doesn't label their Uniqolour Pens, so when I first received them I labeled them left to right on both trays from 1.

Uniqolour used were:
Blue 5, 6
Green 2, 21
Brown 12
Grey 20

Versamark embossing ink
Clear embossing ink
Painters Tape- bad move!!
Paper Rose Daisy Border
Paper Rose Australian Stitched Rect
Altenew Birthday Greetings
Scrap white and black cardstock

Check out the video here

Thanks for stopping by.

Sunday, June 14, 2020

StampingBella Wizard

Today, card is a gorgeous StampingBella image. I love him soo much.


The colouring was an out of the box for me! I did use the packing for inspiration but I have a couple of crystal ball stamps so I’ll be doing this again. I received been playing with rainbow crystal balls.

The background matt was a background I did a few days ago on a retreat. It is simply gold then I water coloured the roof the cardstock trying out to make mud! Lol

Here’s a picture of the leftovers as I didn’t want to use up all that loveliness on one card


Recipe
Hero Art Bold Prints Rings
Uniquely Creative Watercolour Paints
Stampingbella Wiz MO191

Copics Used
Cloak: R59, E18. R27, R24, YR23, Y15
Hat: B99, B97, B95, B93, YR23, Y15
Skin: E04, BV11, E11, E00, E000
Ground and Staff: E59, E57, E55, E53
Beard: C4, C2, C0, 0
Gold: YR23, Y17, Y13
Rainbow: R05, R02, YR07, Y06, G05, G02
B05, B02, BV04, BV02, V04, V01
Inside ball and background: B0000, B00

Thank you for stopping by, take care

Nat

Saturday, June 13, 2020

13th Birthday

Welcome back,

I have a lost and found video today. I thought it was gone but found it. It is pre a new phone so the video, that you find at the end of the post is a little different.


Recipe: 
Avery Elle Balloons
Avery Elle Numbered Balloons Die
Card Deco Inks
Pearlescent Bronze
Pearlescent Olive Green
Paper Rose Stencil Halftone
Distress Oxide Inks Salty Ocean


Copics Used:
B18, B16, B12

Thank you for stopping. You can find the video here

Saturday, June 6, 2020

Rainbow Watercolour

Today's card was abit of a play.

I made pretty ,I have 4 of the same card but altered the technique slightly.

This isn’t a new technique. People have been doing this technique for years.

The first let’s talk about inks I used, as they are the same with a variation on the last.

I used Mini Distress Inks. Why? You get a more brighter colour with the original inks.

I used Candied Apple, Carved Pumpkin, Squeezed Lemonade, Mowed Lawn, Salty Ocean and Wilted Violet. These are probably my favourite for rainbows.

I applied them all in the same way, the difference is when I spritzed it with Water.

Technique one. Spritz water on to the stamp.


Tap the ink onto the stamp in rainbow order. Be careful with your light colours. I had a scrap piece of cardstock that I swiped the ink pad on to remove any unwanted colour. The water will blend the ink if you don’t get close to other colours, so don’t stress. It’s better to get the water to do the work.

Technique 2: water spritzed on to cardstock before stamping.


Mor movement with the ink with this one.

Technique 3 Spritz water on both stamp and cardstock.


 Now there was an issue. Someone may or may not have accidentally swiped their squeezed lemonade onto this panel instead of the scrap! So you will need to check out the video to see what it looked like before I... mean someone stuffed it!

No redos here. I added more colour which lead to the next card, cleaning up the “fixing”

This one was much darker so I added some sequins and a different sentiment with vellum and I coloured the flowers roughly with the watercolour.


I left the stamp in my MISTI, once the panels were dry I restamped with Versamark and embossed each card. The first 3 with Hero Arts White Satin Pearl embossing powder. The last card I stamped it with versatile and embossed with clear.

I hope you enjoyed it. Please check out the video here to see how I fixed my oops!

Thanks for stopping by.

Tuesday, June 2, 2020

Bonus Card!! Lily and Moss

I came across a cute little fun fold. If I can find the person I saw I will link to her but there is probably heaps of people that have done this type of card.

I have cut an A4 piece of cardstock at 10.5cm and we will use both sides of the piece.
The first piece score and fold in half at 14.8cm. We then made a cut at 6.3cm from the front panel on the opening edge. Keep this piece.

 The inside "card" is trimmed down to 9.7 x 25.4cm and folded in half. This is glued centred on the back panel opening to the right. Make sure you glue the very back contrast before you glue the inside "card".

Again on the front you need to glue the text panel down before you glue the saved pieced you cut off the front. You can then glue the green woodgrain and place other elements you want.
Recipe:
Starting from the back.
Green Leaf 10.1 x 14.5
Pink marble, Pink and Tile are all 11.9 x 9cm
Text panel 7.5 x 10
Green Wood 5.9 x 10
 Finally, I added the faux stitching and Star Dust stickles over the front of the card.

You can find the video here

Thank you for stopping by.