Saturday, May 30, 2020

Mermaid Colouring with Copics

Today's is a long one, video wise.

I am really happy with how this turned out.

I used a Katy Sue Design Stamp that I had for a while. I started colouring it with Kathy Rac's 30day colouring challenge on Copic Xpress-It Blending card. However, I only got up the the face, hair and sign.

The die I found on eBay. I checked to make sure it wasn’t a knock off, as it didn’t have a brand. I couldn’t find a branded name. So, I bought it as I love it, but I can’t help you with finding it again. At least I’m sure it isn’t a knock off. I hope!


The base of this card is simple as it is just a die over the top and coloured. Of course there is abit in the colouring... just abit.
Recipe:
Skin: E04, E11, E00, E000
Hair/ Wood: E39, E37, E35, E33, E31
Greens: G29, G05, YG06, YG00
Blues: BV29, B99, B97, B95, B93
Coral ish colour: YR04, YR02, YR61, YR20
Sand: E57, E55, E31 (Stippling E29, E13, 0)

The "For You" was in the darkest blue. I used the chisel tip with the blue background. It was the easiest and quickest way to lay down the colour.

To finish off I used stickles over the body, tail and some Glossy Accents on the bubbles.


You can find the link here

Tuesday, May 26, 2020

Card Number 4 Lily and Moss

Hi Everyone,

Today's card is the 4th and probably the final card. You don't know what will happen! :)


Recipe:
 Stamped panel is 9.7 x 14.1cm
Green Mosaic is 10 x 14.4cm

There is a little more detail in this card to explain.
I used a MISTI corner to position the cardstock a little away from the corner and stamped the flowers. I left everything where it was for later.This gave me a guide on where to place scraps of paper.

I had a few scraps and honestly I looked at what I had and used that! The text paper is a scrap but I did cut a strip of a bigger bit. I wanted lighter colours so you could see the roses. I actually placed a darker strip and once it was glued I decided it was too dark for the rose so up it came.

I placed the strips of paper over the roses at an angle and leaving some of the element on the plain cardstock. There is no reasoning where I put them. I placed them and if I liked it, they stayed! The End! lol
I placed the cardstock back into the MISTI and re stamped the roses over the top of the papers in Versafine again.

I added some bling with Nuvo Crystal Drops and StarDust stickles on the roses.


Full Disclosure I made this card using ink first to try it out. The green I picked wasn't quite what I envisioned. I don't normally redo a card, I just wanted a different look but I'm going to show you everything. Including changing one thing can make a difference.

It's not bad just not what I wanted. So you can do it with ink I just had a different vision.
You can find the video here

Thanks for stopping by.

Sunday, May 24, 2020

Not so quick Watercolour

Hi Everyone,

Quick post today. Not so quick of a card to make.


Recipe:
Stampendous: Papa Christmas (don’t tell him he’s meant to be a Christmas stamp!)
Tailored Expression Simple Strips Background and die
Winsor and Newton watercolour 12 pan palette
Burnt Umber, white, Yellow Ochre, intense Blue, Alizarin Crimson Hue And Cadimum Red Pale Hue

The trick with watercolour is let go and to layer. Take your time and add more colour once the first layer is dry. I have mixed a few colours together and just played! 

No video today as I just wanted to play. I am not an experienced watercolour...er... person.


I hope you enjoyed it.

Thanks for stopping by.

Natalie xx

Saturday, May 23, 2020

Welcome little one Card 2

So I had a run using this die.

This time I wanted to make a shaker card.  I centred the die in the middle of the panel that was cut to 14.4 x 10cm. I will still use this on the final card.

I glued the acetate on then the one layer of foam strips. I used Magic Scraps and some plastic stars inside to shaker. I have only been able to find Magic Scraps on Etsy here


Once adding the foam and shaker elements I placed the die cut over the alcohol ink working out where I wanted it to be placed.
 On the remaining cardstock I used to cut out the die, I layed thin foam tape so it would be raised up but only slightly. I placed this over the element and pushed it to the background.

Finally I placed some Uniquely Creative Tropical Sea Sequin mix and added these around the edge. Simple card that allows the shaker element to shine.

You can find the video here.

Thank you for stopping by.

Tuesday, May 19, 2020

Card Number 3 Lily and Moss

Hi Everyone,

Today's card is number 2 in the series.


All papers are from the paper pad and only the sentiment is a stamp.
The individual tiles and straight from the paper and just cut apart.

The marble paper is cut at 7.5 x 12
Pink Dot paper is cut at 8 x 12.5
The dark green on the side is a piece of scrap but it is 1.5 cm wide.
Green wood underneath the sentiment is 1.6 x 8.5cm

Sentiment is stamped with Versafine and embossed with clear embossing powder.


Finally I added abit of stickles to add some bling!

You can find the video here
Thanks for stopping by.

Monday, May 18, 2020

CASE HOP

Today I am involved in a Hop.  CASE hop where you basically copy a fellow creator.
This is her cards


My card is a little bit brighter and of course I used completely different images.

We have used the hastag #CASEthefellowcreator So feel free to check that out.

Recipe:
Stamps 
Lesia Zgharda Design FL116
Hero Arts Rings Bold Print
MFT Dizzy Doily die
PaperRose Stitched Circles

Ink
Versamark embossing ink
Versafine Black Onxy
Candied Apple
Spiced Marmalade
Squeezed Lemonade
Mowed Lawn
Salty Ocean
Wilted Violet

White and Clear Embossing Powder.


You can find Lesia here
You note there is 2 cards, all that yummy rainbow ink I HAD to mop it up.

My video is here

Now you have checked this card out go over to Marla at Mad about Cards and Crafts and see what inspired her here. 

I hope you enjoyed it.

Natalie

Sunday, May 17, 2020

Unexpected Finds

Today I have a card for you that I didn't expect.

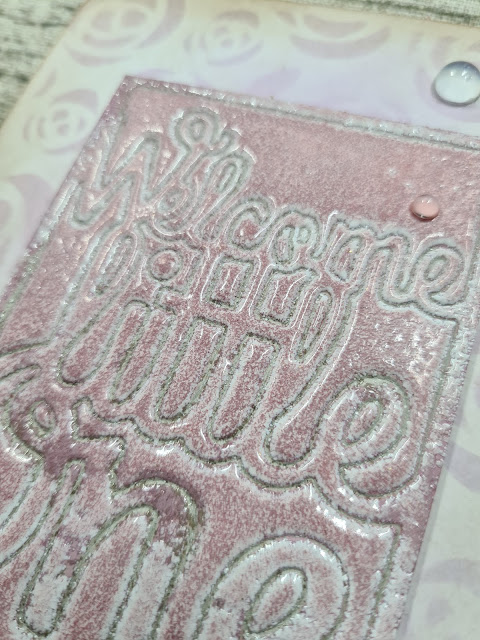
I tried to emboss the outer part of the Taylored Expression Welcome Little One die and cut out the inner parts.  FAILED! When I finally got it to cut it had destroyed the panel I was using. But, I was left with a chipboard area that was perfectly embossed. So what the hay...


 Recipe:
Taylored Expression Welcome Little One
Kaisercraft rose stencil and Victorian Velvet
Walnut Stain around the edges.

I really played and just see what happened. I applied Vic Velvet over the image and applied white embossing powder. I applied several extra coats of ink and embossing but this time clear, until it was all smooth and lovely.
 Finally I added some clear drops using multi mat medium. Depending on where these were applied  some took on the pink.

I hope you enjoy. Thank you for stopping by.

Celebration Video Hop


Today's card is to celebrate Christine Patterson reaching 500 subscribers. She is a team member for Scrapping for Less. There is even a $50 gift card to Scrapping for Less to be won.

I made a simple card for you today.

Stamps Used Adorable Elephant by MFT
Ink: Momento Tuxedo Black
Squeezed Lemonade
Scattered Straw
The Crafters Workshop Stencil- Mod Spirals
Sequins from my stash

Copics Used:
V28, V25, V22
BV25, BV23, BV20
V09, V06, V04
C7, C5, C3, C1
R20


Check out the video here.

The next person on the hop is Renee Moran. Click here to see her awesome card.